")
")
")
DJI Store Madrid & Support Center Stockrc

9:00-14:00 and 16:30-19:30
Phone: 0034 91 851 20 96


Now: American Express
![]()
Redsys (Visa/MasterCard/4B/ServiRed)

Paypal
![]()
web optimized for Mobile


DJI Madrid & OFFICIAL Support Center Fpv Systems OSD Telemetry GPS AttoPilot Voltage and Current Sense Breakout - 180A
AttoPilot Voltage and Current Sense Breakout - 180A
In stock
can be shipped within 1 days

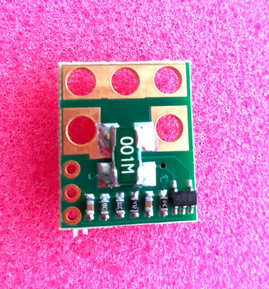
AttoPilot Voltage and Current Sense Breakout - 180A
Description: This is a small voltage and current sense PCB. DC current is determined by measuring a voltage drop across a pair of parallel shunt resistors, then converted to a final analog voltage output by the TI INA-169. Voltage sense is accomplished by scaling to 3.3V ADC range by a precision resistor divider.
The PCB is supplied without leads or connectors. The pad sizes are large enough to accommodate 12 gauge heavy duty leads (see datasheet) but care must be exercised in soldering. Smaller gauge leads are considerably easier to solder without creating shorts.
Features:
- 51.8V Max
- 178.8A Max
- Very low zero current offset
- Analog output scaled for 3.3V ADC
- Self Powered
Dimensions: 4 x 15 x 19mm
Connection to APM

Connect the autopilot sensor to APM as shown in the photo above including connecting:
- V pin (voltage) to APM’s A1’s S pin
- I pin (current) to APM’s A2’s S pin
- GND pin (ground) to APM’s A1 “-” pin
Connection to Pixhawk

Connecting the autopilot sensor to the Pixhawk requires modifying a DF13 6 position cable as shown in the photo above including connecting:
- V pin (voltage) to the Pixhawk’s Power Connector Pin 3 (3rd pin from the left above)
- I pin (current) to the Pixhawk’s Power Connector Pin 4 (4th pin from the left above)
- GND pin (ground) to the 1st pin on the left
Setup in Mission Planner
To configure the sensor go to the Mission Planner’s INITIAL SETUP > Optional Hardware > Battery Monitor page and set the “Monitor”, “Sensor” and “APM” fields as shown in the image below. If a battery is then connected you should see the “Battery voltage (Calced)” field become populated with the voltage of the battery.

Note: Due to the voltage scaling of the sensor to 3.3V, the maximum current you can measure with the 180Amp sensor described here is actually 272Amps and for the smaller AttoPilot 90A sensor it is 136Amps.
Calibrating the voltage sensor
You can calibrate the voltage sensor to match the voltage from a hand-held volt meter by following the instructions on the 3DR power module page